
Electronics
Overview
The nickel hydroxide/oxyhydroxide actuator needs to be actuated in a 3-electrode electorchemical cell, with a voltage applied across the actuator and the counter electrode to trigger actuation in the actuator. The purpose of the electronic system is to supply a stable voltage (~+/- 1.5 V) to the six actuators installed onto the boat-shaped, floating device to enable propulsion over a specific period of time (approximately 15 minutes). In order to make the acceleration of the robotic device easier, the electronics were as compact and as light as possible. Wireless control was used to start the boat's motion program so that it would be free of wire restriction during motion. The weight of the electronics was balanced by the buoyancy of the boat, and the on-board components included: a battery and a circuit board with a remote control module.
This page introduces the electronic systems developed by the team. The remote control function here only involves 'starting' and 'terminating' the actuation. Directional control of the robot is more complicated as it involves changing the actuation frequencies and bending degrees of the actuators, and it was thus not investigated. To start the program by pressing a button on a TV remote controller, coded IR signals would be emitted and picked up by an IR receiver which we installed onto our circuit board. The signal would be decoded by the IC, and actuation voltage would supplied to the actuator to start propelling.
Alternative external circuit design with voltage divider

Figure 3-4. The photo of final assembled circuit and list of electronic components
Figure 3-3. Circuit connection diagram of electronic components

In this project, we have demonstrated that both versions of external circuit can supply suitable voltages to the actuators to trigger actuation, thereby propelling the floating device to move forward. The next stage of this project is to further reduce the size of the robot, so that the velocity of the robot could be increased. The measures which can be considered:
1. From PCB to application-specific IC
The dimension of the current PCB is 2 cm x 5.5 cm, with the microcontroller ATmega328P occupying 36% of the space (while the rest of the space are for installing voltage divider circuit). The size of the electronics can be further reduced by fabricating a customized (application-specific) integrated circuit (IC) incorporating the functionality of ATmega328P and voltage divider circuit. The cost of this, is of course, extremely high. An alternative is to modify the wiring layout of the current PCB to create an even more compact version. Also, using smaller microcontroller chips as ATmega328, which is the microcontroller for Arduino Nano (which has similar functionality as Arduino UNO but has a different packaging), also help reduces the PCB size.
2. Wireless power transfer to eliminate battery weight
The battery used (Enegizer A23 12V Alkaline battery) weights 8g and represent 16% of the total weight of the robot (total weight~50g). Wireless power transfer methods eliminates the use of batteries and enables further weight reduction. Two main methods for wireless power transfer include magnetic induction and photovoltaic cells ( + laser tracking system), which are briefly explained below.
1. Magnetic induction
By Lenz's law, the change of magnetic flux in the primary coil induces a current in the secondary coil, and the secondary coil is directly connected to the actuators to trigger actuation. There has been examples of using magnetic induction to remotely power up 5 micro-robots which adds up to a power consumption of 1W. Since the Nickel hydroxide/oxyhydroxide actuator can be actuated at sub-voltages below 0.4V and currents in the range of mA, magnetic induction may be a feasible way to power up the robot without using a battery. The advantage is that the system could be built at low cost, and it only requires simple electronic devices. However, a major concern is that the induced current using magnetic induction method is a function of time and is not a stable step voltage, which may cause unstable actuation in the actuators. A battery may still be required to act as temporary energy storage device between magnetic coils and actuators to suppl a stable current, which limits the weight reduction benefit of this method. A proposed circuit for magnetic induction could be found

2. PV cell + light source + motion tracking system
Another possible wireless power transfer technique is to incorporate an on-board solar cell. An external light source which tracks the location of the robot while continuously directing a high intensity light beam to the solar cell has to be constructed. The electronic components required to build this system may be more complicated than magnetic induction method, and the issue of unstable actuation caused by unsteady current supply from the solar cell is still a concern. Nevertheless, MIT has successfully built a robot powered by this method and the article can be viewed

Picture source: http://www.ordigami.net/files/timer555/finger_timer555.jpg
What's next? - Future work

The following diagram shows the signal transmission process from pressing the 'start' button on the TV remote control to actuation of actuators. The following sections explain how each of the subsystems are constructed/programmed.
Arduino program - decoding IR signal from IR receiver

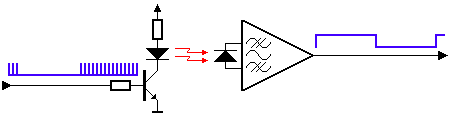
Figure: Schematic of how IR transmission works
Source: https://www.quora.com/How-do-an-IR-transmitter-and-receiver-work
IR transmitter
IR receiver
The TV remote control encases an infrared (IR) transmitter consists of an LED which emits the IR radiation. When a button is pressed on the remote controller, the IR transmitter emits IR radiation with a coded pattern according to the information of the pressed button. This radiation is picked up by the IR receiver, consisted of a photo diode that converts light into voltage pulses. Since the IR radiation is invisible to human eye, it is suitable for wireless communication.
The IR radiation emitted by the IR transmitter isn't just any random signal. Each button on the TV remote control is assigned to a specific code and that code assigned to a specific radiation pattern emitted by the transmitter. The pattern emission is completed within a very short time (commonly at 38kHz) and is detected by the IR receiver.
Put it in more simple words, IR transmission works in the same principle as message coding and decoding in military fields. On the battlefield, there is someone responsible for encoding and decoding the messages. The microcontroller is the decoder which interprets the coded message from IR transmitter and executes orders (Arduino program) accordingly.
For example, if I press the 'Power' button on the TV remote control to command the robot to start swimming, then the Arduino Program (downloaded to the microcontroller ATmega328) may look like this:
void loop()
{
if(results.value == 868255232)
{
ForwardState = 1;
LeftState = 0;
RightState = 0;
OffState = 0;
}
Here you can see that the digital number '868255232' represents the action of pressing the 'Power' button on the TV remote control. In fact, this number is transmitted by a specific pattern of IR radiation in the air, and is converted into modulated voltage patterns after being received by IR receiver. The microcontroller interprets this voltage pattern as the 'start' command and then executes the following commands.
Arduino program - turning decoded signal into actuation command
In this project, steering of the robot is not considered, and therefore the only possible signal is to tell the robot to go ahead. We noticed now the variable ForwardState has been changed to '1', i.e. turned 'ON'. The printed circuit board should now output actuation voltage to the actuators to start propel the floating robot. From 'Material Characterization' section, we know that the actuation voltage under 2-electrode setup is approximately 1.5V. Taking voltage drop due to wire resistnace into consideration, we supply a voltage of 1.67V across the working electrode (actuator) and the counter electrode (platinum mesh). The Arduino program would look something like this:
if (ForwardState == 1)
{
analogWrite(LeftActuatorPin, 168); // output voltage is Vin * 168/255 = 3.3V
analogWrite(CounterElectrodePin, 84); // output voltage is Vin * 84/255 = 1.67V
analogWrite(RightActuatorPin, 168); // output voltage is Vin *168/255 = 3.3V
delay(4000); // 4000 means 4000 ms = 4 sec
analogWrite(LeftActuatorPin, 0); //output voltage is 0V
analogWrite(CounterElectrodePin, 84); // output voltage is Vin * 84/255 = 1.67V
analogWrite(RightActuatorPin, 0); //output voltage is 0V
delay(3000); // 3000 means 4000 ms = 3 sec
}
The schematic of the above process is illustrated in the figure below.
External circuit
The reason why the counter electrode (CE) is not directly connected to the ground but given a constant voltage level of 1.67V is because CE is immersed in electrolyte during actuation, and therefore it has an unknown electrical potential other than zero value. Hence we prescribe a constant voltage value to CE such that we can have a good control over the absolute potential difference across the actuator and CE.
Now the job left is to construct a circuit board which integrates the IR receiver, microcontroller (ATmega328), and the actuators. Note that in previous figure, the 12V output from the alkaline battery is reduced to 5V through a voltage regulator, and thus the voltage regulator and its accompanying capacitors (they must work together) must be integrated into the circuit. In addition, the microcontroller needs a crystal oscillator in order to count time properly, and must also be added to the circuit. The schematic and the finished electronic circuit are shown below.

Full Arduino program for this circuit configuration can be viewed here.

Figure 3-5. The schematic of the voltage divider circuit to convert microcontroller input voltage to actuation voltages applied to two actuators
In the last example, we made use of the voltage amplifier within the microcontroller such that the output voltages at the output pins of microcontrollers can be directly applied to the actuators. The problem of this approach is that the voltage are sometimes unstable. Since we cannot tolerate a great fluctuation in actuation voltage to meet the actuation requirement (at least 1.5V potential difference across actuator and CE), we designed an alternative circuit.
In this configuration, the microcontroller directly output 0V/5V to both actuators and a constant 5V to the CE. The actual potential difference across the actuators and CE is then modified using 6 resistors which form a voltage divider. Since the output voltage of 5V is equal to the input voltage of the microcontroller, the output voltages are more stable and reliable. The circuit diagram of the voltage divider is shown below.
The drawback of the alternative circuit configuration is that 6 resistors would occupy a great amount of space on the circuit board. Thus, we customized our circuit board and made use of surface mount resistors and capacitors to save space. The schematic of electrical connections, wiring layout, and the final circuit assembly are shown in figures below.


(A) When the bottom and the top branch is at a constant step voltage of 5V, the
voltage at A1 and A2 are:
5V * (2R/(2R+R)) = 3.33 V
On the other hand, the voltage at CE is
5V * (R/(2R+R)) = 1.67V
Hence, the total potential across A1/A2 and CE is 3.33V - 1.67V = 1.67V
(B) When the bottom and the top branch is at 0V, the voltage at A1/A2 are 0V. The
voltage at CE remains at 1.67V.
Hence, the total potential from A1/A2 to CE is 0 - 1.67V = -1.67V
Noted that the resistor values R and 2R should be as large as possible, since by Ohm's law,
I = V/R
The larger the resistance, the less the current drawn. This reduces the power consumption of the battery and therefore a lighter battery with lower energy capacity could be selected to reduce weight. Weight minimization is very important since the propulsive force generated the actuators is very limited.
However, the resistance values R, 2R should also be well below 1 Mega Ohm in order to prescribe an open circuit condition between actuators and CE. Since we had measured the resistance across actuators and CE with multimeter to be in the range of mega ohms, the branch between actuators and CE can be viewed as an open-circuit if 2R << 1 mega ohm. We can thus calculate the potential drop across actuators and CE as (V(A1 or A2)- V(CE)) . If the value for R approaches mega ohm, then the resistance across WE and CE could not be neglected and the voltage across these the actuators and CE could not be calculated using the method above. The resistance value needs to be optimized to balance the trade-off between increasing resistance to decrease power consumption of the circuit and keeping the resistance well below mega ohms. Such an optimization calculation is not attempted in the present work, and it should be considered in future work.
The R and 2R values were selected as 100 ohm and 200 ohm for convenience. The circuit draws approximately 80mA during actuation as measured by multimeter.
Figure 3-10. Three CR2016 button cell batteries connected in series (left) and GP Ultra 12V battery (right)
Hence, the Energizer A23 12V battery was selected as the power source in our final prototype.


Batteries are stable, easily purchased energy source to power up our robot. However, the weight of the battery takes up a large percentage of the robot's total weight and was a major concern. Although some underwater robots make use of off-board power sources, which eliminates the battery weight on-board, these robots are often restricted to their power source by wires which may affect its free locomotion tests. Therefore, we decided to adopt an untethered (wireless) design so that the robot would be free of wires' restriction during the motion test. Of course there exists other approaches to supply energy to the robot via off-board means, such as wireless power transfer. It would however require significant research efforts to put it into use. Due to the time constraint, we considered battery as the only source of energy for our robot.
In the first preliminary version of prototype, a 9V battery was used. The battery weight accounted for nearly 50% of the overall weight, which is unacceptable (see below).
Battery seletion
We therefore truned to button cells, which appear light and compact. However, we found button cells were not able to deliver sufficient output current to trigger actuation. This is because button cells such as CR2016 (each supplying 1.5V) are designed for lower power applications, i.e. those drawing current below 0.1mA, which is much lower than the peak current we identified using multimeter during actuation (around 80mA).
Finally, we found Energizer A23 12V Alkaline Battery (commonly used in cameras) which is capable of sustaining a stable voltage output of 12V over a long period of time. We were curious about the differences between 9V battery, button cell, and 12V alkaline battery, and therefore we setup an experiment to compare their performance. The setup is shown on the left. In this setup, the three types of batteries took turns to be connected to a voltage divider circuit for 5 minutes, and their reduction in voltage levels after the test were recorded.

Figure 3-1. Overview of signal transmission within electronic system
Figure 3-2. Schematic of actuation voltage transmission
Figure 3-6. Alternative circuit connection diagram involving the use of voltage divider
Figure 3-7. Wiring layout of alternative circuit connection diagram involving the use of voltage divider (drawn in software "Eagle")
Figure 3-8. Photo of alternative external circuit involving the use of voltage divider and the list of electronic components
Figure 3-9. The weight of 9V battery and the total weight of first version robot prototype